
How to Make Big Head Cutouts: DIY Guide
Posted by Bruce on May 23rd 2026

To make big head cutouts at home, choose a clear, high-resolution front-facing photo, crop the head and shoulders, enlarge the image, print it, mount it onto rigid backing, and attach a sturdy handle. DIY big head cutouts require materials such as poster paper, foam board, cardboard, spray adhesive, scissors, craft knives, and wooden sticks. These oversized face signs suit graduation ceremonies, sports games, birthday parties, concerts, school celebrations, and other events where personalized handheld displays improve crowd visibility.
The process involves resizing the portrait to dimensions such as 12 × 18, 16 × 20, or 24 × 36 inches, then printing it across tiled sheets or through a professional printing service. Carefully align adjoining pages before mounting the assembled image on 3/16-inch foam board or sturdy cardboard. Cut around the hair, face, and shoulder outline using controlled blade movements. Reinforce the handle with adhesive and tape to prevent bending. For outdoor events, protective film and moisture-resistant backing help reduce damage during temporary use.
8 steps to make a DIY big head cutout at home:
- Choose a clear, high-resolution front-facing photo.
- Crop the image around the head and shoulders.
- Resize the portrait to your desired cutout dimensions.
- Print the image using tiled sheets or a printing service.
- Trim and assemble the printed sheets accurately.
- Mount the assembled image onto foam board or cardboard.
- Cut carefully around the head and shoulder outline.
- Attach and reinforce a sturdy handle on the back.
What Materials Do You Need to Make a Big Head Cutout at Home?
Materials needed to make a big head cutout at home (DIY) include a printer, poster paper, cardstock, foam board, cardboard, glue, scissors, a box cutter, wooden sticks, a paint stick, and a cutting mat. These materials work together to print the oversized portrait, support the cutout structure, cut accurate outlines, and create a durable handheld display prop for graduation ceremonies, birthday parties, sports events, and other occasions.

11 essential materials required to make a big head cutout at home are:
- Printer: A high-quality inkjet or laser printer prints the oversized image across multiple sheets using a tiled printing layout for large-format assembly.
- Poster paper: Heavyweight poster paper improves color saturation, print sharpness, and ink durability compared to standard office paper.
- Cardstock: Provides additional reinforcement for smaller graphics, logos, borders, and layered customization elements.
- Foam board: A 3/16-inch foam board provides lightweight yet rigid support, preventing the big head cutout from bending during use.
- Cardboard: Double-walled corrugated cardboard serves as a durable and cost-effective backing option for outdoor sports signs and large face cutouts.
- Glue or spray adhesive: Permanent spray adhesive creates a smooth, bubble-free bond between the printed image and the rigid backing material.
- Scissors: Sharp craft scissors help trim printed sheets and remove excess paper before final mounting and detail cutting.
- Box Cutter or X-Acto Knife: A precision blade creates clean cuts around detailed hairlines, curved edges, and thick backing materials.
- Wooden sticks: Act as the primary handle and should be secured at least halfway up the back of the sign to provide structural support.
- Paint Stick or Dowel: A flat wooden paint stirrer or a thick dowel provides a comfortable, ergonomic grip that remains stable even when the sign is being waved.
- Cutting mat: A self-healing mat protects your tabletop and preserves the sharpness of your blades while you perform the final precision trimming of the cutout.
How to Make Big Head Cutouts Step by Step?
To make big head cutouts at home, select a clear, high-resolution front-facing photo and crop around the head and shoulders. Resize the image to your preferred dimensions, then print it using tiled sheets or a professional printing service. Align and assemble the printed pages, then mount them on rigid foam board or cardboard. Carefully cut around the head outline, attach a sturdy handle, and reinforce it for stability.
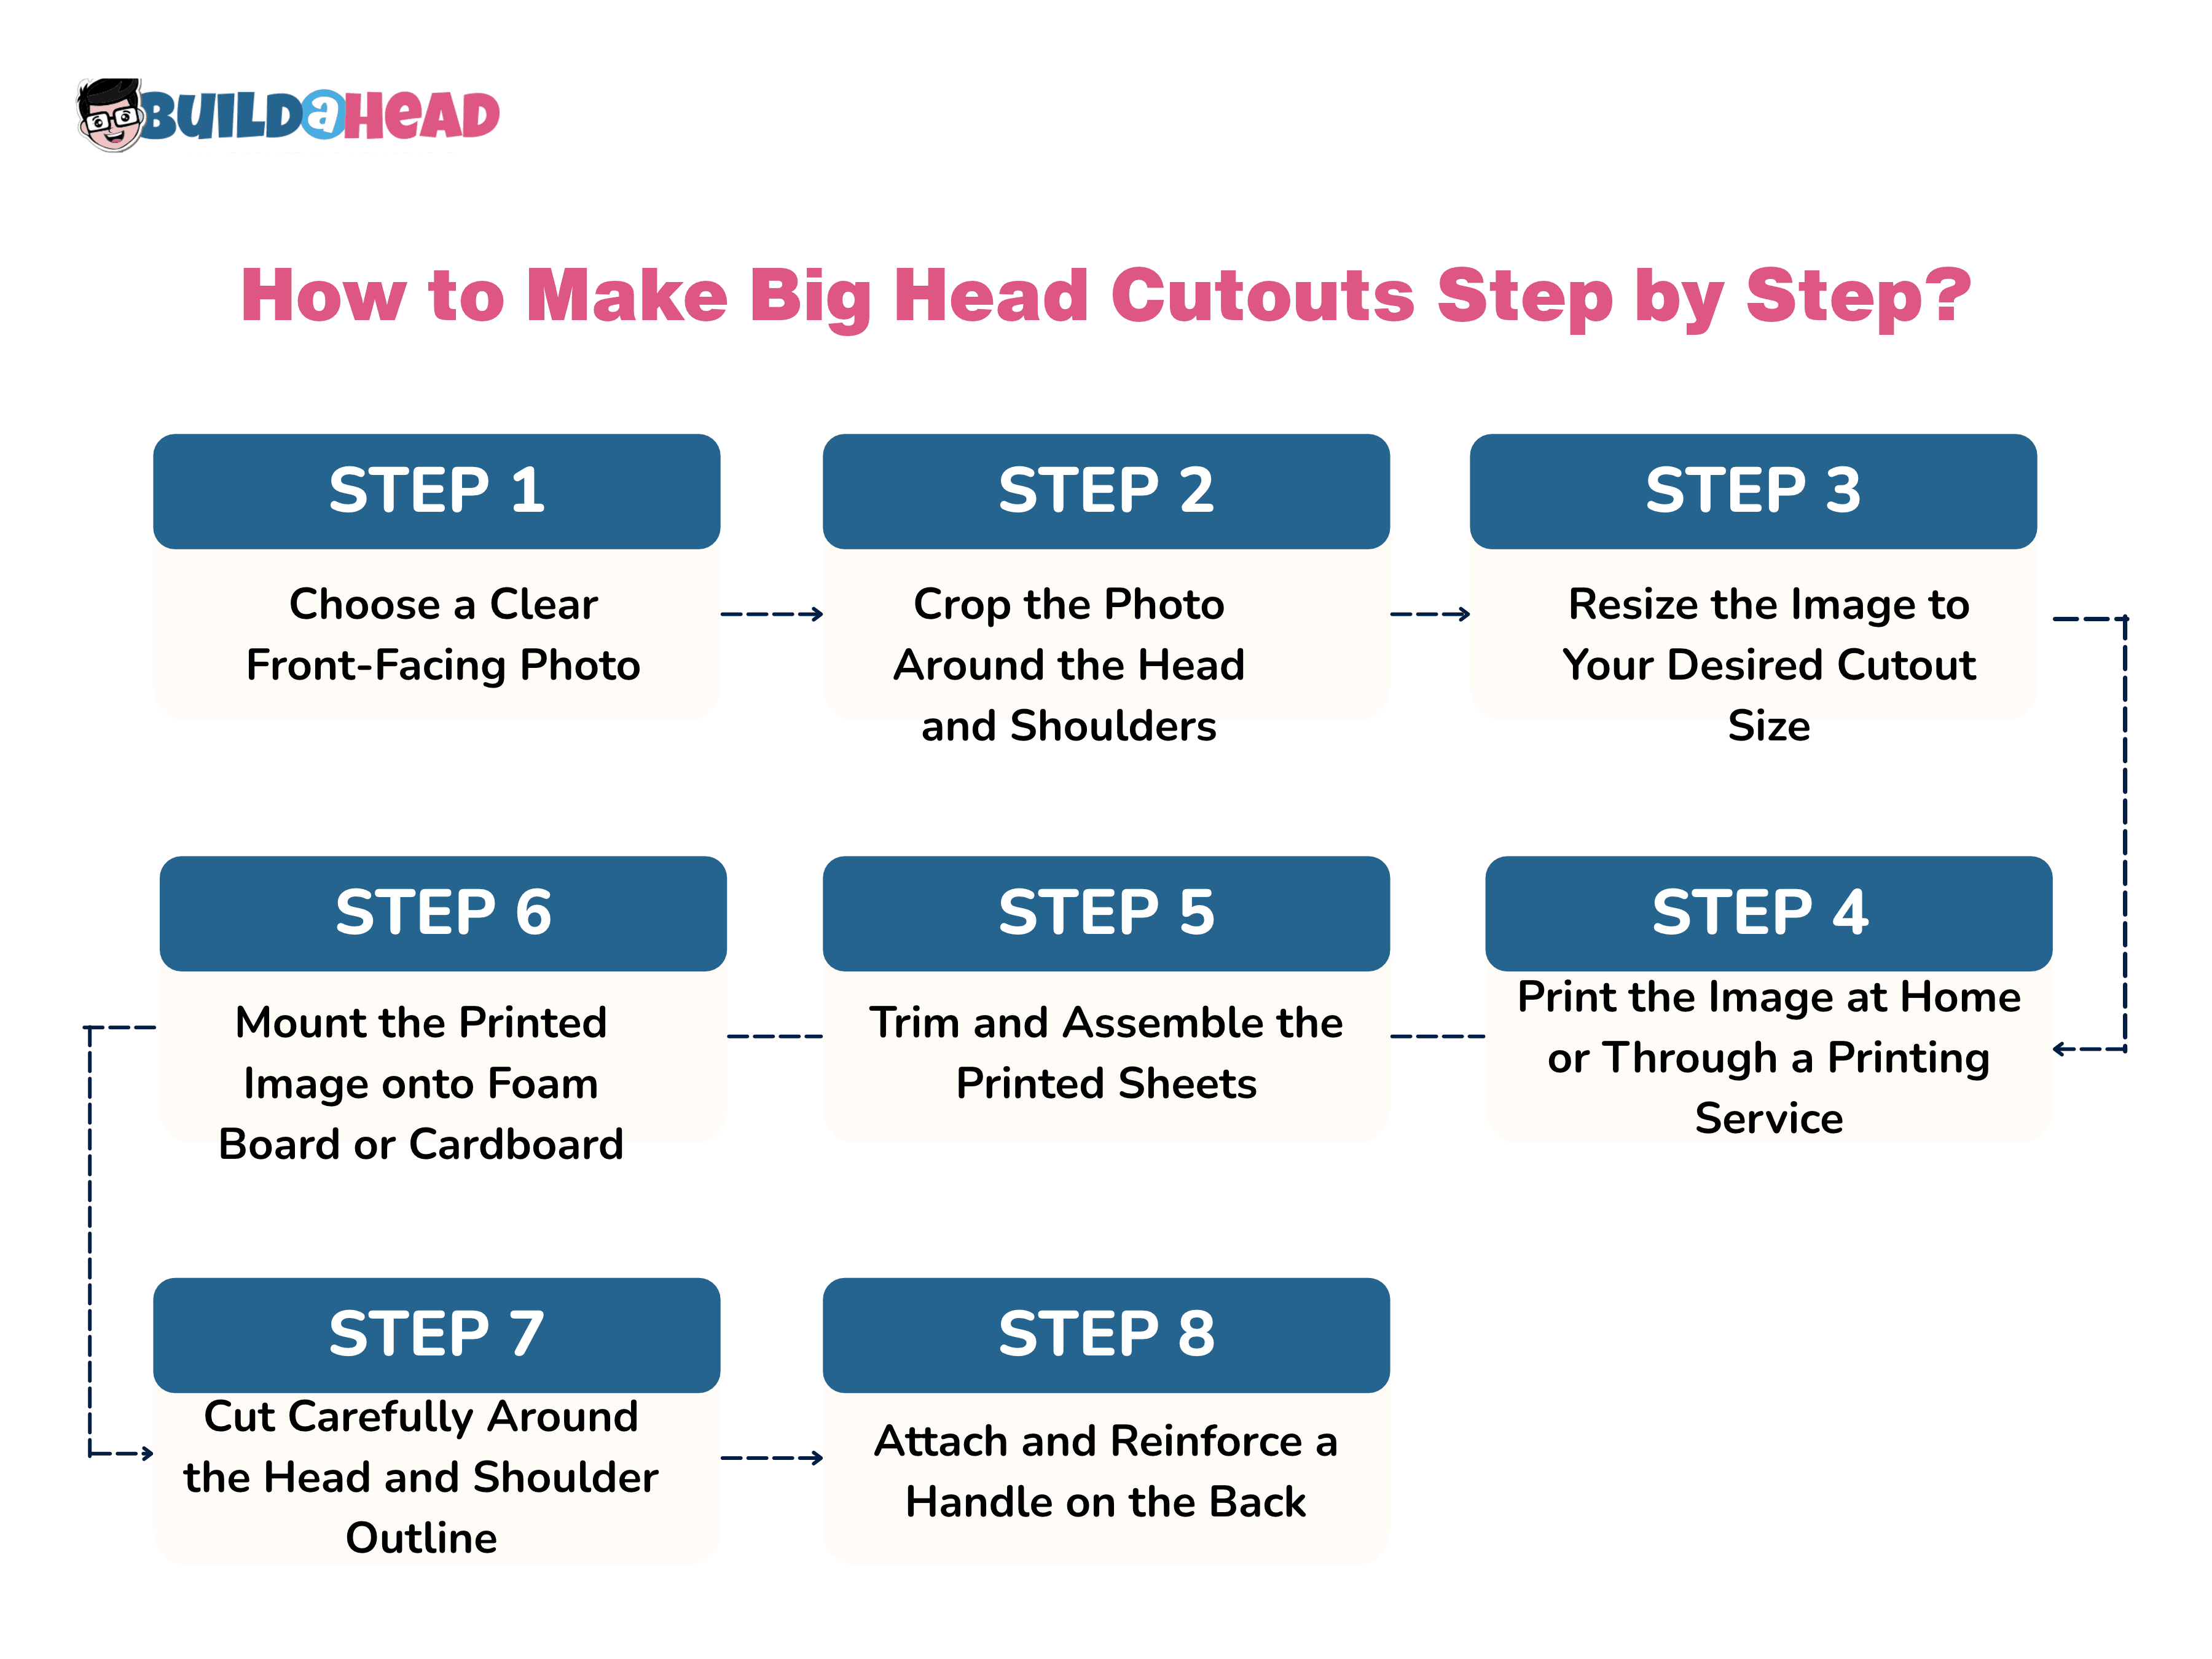
Follow these eight steps to make a DIY big head cutout at home:
Step 1: Choose a Clear Front-Facing Photo
Choose a sharp, high-resolution portrait that shows your entire face, forehead, chin, and hairstyle without obstruction. Take the photograph vertically in natural, even lighting against a contrasting background. Avoid blurry selfies, heavy filters, and digital zoom, which reduce image clarity when enlarged. Use the original camera file rather than a compressed screenshot, and keep facial features centered and detailed enough for large-format printing.
Step 2: Crop the Photo Around the Head and Shoulders
Open your photograph in Canva, Photoshop, or another image editor and crop around the head, neck, and upper shoulders. Remove unwanted backgrounds using 'remove.bg' if necessary, carefully preserving hair, ears, and accessories. Keep the original aspect ratio and leave a small margin around the silhouette. For easier cutting, consider adding a thin white outline around the finished portrait before printing.
Step 3: Resize the Image to Your Desired Cutout Size
Resize the portrait to fit an 18 × 24-inch poster for handheld displays or a 24 × 36-inch poster for larger events. Maintain the aspect ratio to prevent facial distortion. Target 150–300 PPI at the final dimensions, requiring 2,700 × 3,600 pixels for an 18 × 24-inch print at 150 PPI. Preview the enlarged image for visible pixelation.
Step 4: Print the Image at Home or Through a Printing Service
Resize the portrait to fit an 18 × 24-inch poster for handheld displays or a 24 × 36-inch poster for larger events. Maintain the aspect ratio to prevent facial distortion. Target 150–300 PPI at the final dimensions, requiring 2,700 × 3,600 pixels for an 18 × 24-inch print at 150 PPI. Preview the enlarged image for visible pixelation.
Step 5: Trim and Assemble the Printed Sheets
Arrange the printed sheets on a clean, flat surface by page number and registration marks. Trim designated white margins using scissors or a paper trimmer, leaving the specified overlap. Match adjoining facial features, hairlines, and colors before securing the pages. Apply clear tape along the back of each seam to prevent gaps, wrinkles, or duplicated image sections across the assembled portrait.
Step 6: Mount the Printed Image onto Foam Board or Cardboard
Choose 3/16-inch foam board, double-wall cardboard, or corrugated plastic for the cutout backing. Foam board works well for lightweight indoor displays, while corrugated plastic offers greater moisture resistance for outdoor events. Apply photo-compatible spray adhesive or an even layer of suitable craft glue, position the print, and smooth outward from the center. Allow the adhesive to dry completely before cutting.
Step 7: Cut Carefully Around the Head and Shoulder Outline
Place the mounted portrait on a self-healing cutting mat and trace the head, hair, ears, and shoulders. Use sharp scissors for thinner cardboard or a craft knife for thicker foam board, making several controlled passes when necessary. Follow a narrow white border if intricate hair edges are difficult to cut. Gradually remove excess backing and inspect the silhouette for uneven or jagged edges.
Step 8: Attach and Reinforce a Handle on the Back
Attach a wooden paint stirrer, dowel, or rigid handle vertically to the back of the cutout, extending halfway up the portrait. Leave 6–8 inches exposed below the cutout for gripping. Use strong adhesive and duct tape, then reinforce the connection with an additional cardboard patch. Let the adhesive cure, then test the cutout's balance before taking it outdoors.
How Do You Assemble Tiled Sheets for a Big Head Cutout?
To assemble tiled sheets for a big head cutout, arrange the individual printed pages into one complete image. Tiled sheets are separate paper sections that form an oversized print when joined. Follow the correct page order, match overlapping image details, and secure adjoining edges to create a continuous portrait without gaps or misaligned facial features.
Below are the steps to assemble tiled sheets into one complete big head cutout image:
- Place printed sheets in sequence using page numbers or registration marks.
- Locate overlapping image sections and white margins along adjoining edges.
- Trim unnecessary borders using scissors or a straight-edge cutter.
- Align facial landmarks, hairlines, and other matching details across adjacent sheets.
- Temporarily hold the aligned pages with small pieces of removable tape.
- Apply clear tape along the back of each seam to join the sheets.
- Check the assembled image for gaps, duplicated features, and uneven alignment.
How Do You Align Printed Sheets Without Visible Seams?
To align printed sheets without visible seams, overlap adjoining pages and match recognizable image features before securing them. Use registration marks, facial landmarks, and hairlines to keep positioning accurate. Trim excess white margins with a straight edge, temporarily tape the aligned sheets, and join them from behind to prevent visible gaps or duplicated image sections.
6 crucial steps to align the printed sheets accurately and minimize visible seams are:
- Match printed registration marks to establish the correct sheet positions.
- Overlap adjoining edges until repeated image sections align accurately.
- Trim excess white margins using a ruler and sharp cutter.
- Match eyes, eyebrows, hairlines, and other continuous facial details.
- Hold the aligned sheets in position with temporary tape.
- Secure each seam from behind and press it flat to minimize visible ridges.
How Do You Cut Around a Big Head Cutout Cleanly?
To cut around a big head cutout cleanly, use a sharp cutting tool and make controlled passes along the mounted image outline. A cutting mat protects the working surface, while a consistent blade angle improves edge accuracy. Use scissors for thin materials and a craft or utility knife for thicker backing to keep the contour smooth.
Follow these steps to achieve a clean, precise big head cutout:
- Place the mounted big head cutout on a stable cutting mat.
- Use sharp scissors for thin cardboard or a craft knife for thicker foam board.
- Maintain a consistent cutting angle as you follow the printed outline.
- Rotate the board around curved hair sections instead of forcing the blade sideways.
- Make short, controlled cuts around ears, necklines, and inside corners.
- Cut thicker backing with multiple shallow passes to prevent rough edges.
- Trim uneven material and remove loose paper fibers for a smooth finished outline.
How Do You Make Big Head Cutouts on a Stick?
To make big head cutouts on a stick, print and cut the oversized face image, mount the print onto foam board or cardboard, and attach a wooden stick, PVC handle, or paint stick to the back for handheld support. A properly assembled big head on a stick should stay lightweight, balanced, and rigid enough for sports events, graduation ceremonies, fan sections, and party displays.

Follow the steps below to make big head cutouts on a stick:
- Step 1: Print the oversized face image in high resolution
- Step 2: Cut around the head and neck outline carefully
- Step 3: Mount the printed cutout onto foam board or cardboard
- Step 4: Attach a wooden stick, PVC handle, or paint stick to the back
- Step 5: Reinforce the handle attachment area with adhesive and tape
- Step 6: Test the balance and rigidity before event use
What Stick Materials Work Best?
The best stick materials for big head cutouts include wooden dowels, PVC handles, paint sticks, and foam handles. Each option affects grip comfort, structural support, balance, durability, and long-term usability differently, depending on the size of the handheld face sign and the type of event.
4 stick materials that work best for big head cutouts are:
- Wooden dowels
Wooden dowels provide lightweight support for medium-sized big head cutouts and are commonly used for sports signs, graduation big heads, and fan-face cutouts. The round grip feel makes them comfortable to hold during events while still providing stable support for handheld display props. They are inexpensive, easy to attach, and available in multiple thicknesses for different big head cutout sizes.
- PVC handles
For those building extra-large or giant face DIY cutouts, PVC pipes provide much stronger structural support than wood. PVC is virtually bend-resistant and highly reusable for future events, making it better than thinner wooden sticks, and it works well for reusable big head signs used during outdoor games or stadium events. Its rigidity makes it one of the most reliable options for oversized portraits that may bend under their own weight.
- Paint sticks
Paint sticks, especially 5-gallon sizes, are a favorite for DIY big head cutouts because their flat shape significantly improves adhesive contact, providing a wide surface area that is easy to tape or glue securely to the foam board backing. Because they are commonly available (often for free or very cheaply at hardware stores), they are a stable, beginner-friendly option for standard-sized handheld props.
- Foam handles
Using foam handles for DIY big head cutouts provides a comfortable grip and softer handling during long events such as concerts, pep rallies, and graduation ceremonies. Their lightweight structure helps reduce hand fatigue while carrying smaller handheld props. Foam handles are less rigid than wood or PVC, so they work better for lightweight face cutouts rather than oversized, large-format signs.
How Do You Keep Head Cutouts From Bending?
To keep head cutouts from bending, use a rigid enough backing and reinforce areas that take pressure during handling. A 3/16-inch foam board or sturdy corrugated cardboard provides structural support, while correctly positioned handles and back braces distribute weight. Wider cutouts require additional reinforcement, especially around unsupported sections. Protect the backing from moisture and store it properly to keep it from losing shape.
Below are the steps to prevent a big head cutout from bending:
- Use rigid foam board or thick corrugated cardboard instead of flexible poster paper.
- Select backing thickness based on the cutout's width, height, and overall weight.
- Position the handle vertically near the center to distribute weight evenly.
- Attach cardboard strips or lightweight back braces across large unsupported areas.
- Reinforce narrow sections around the neck and shoulders where bending may occur.
- Keep the cutout away from moisture and humidity that can weaken cardboard.
- Store the finished cutout flat on a supported surface or upright against a rigid backing.
How Do You Make a Big Head Cutout Weather-Resistant?
To make a big head cutout weather-resistant, protect both the printed image and exposed backing from moisture. Apply clear protective film or lamination to reduce ink smearing, and use moisture-resistant adhesive to prevent peeling. Seal exposed edges and select water-resistant backing for temporary outdoor use. These protective measures reduce moisture damage but do not make ordinary cardboard or foam board fully waterproof.
Below are the steps to improve weather resistance for outdoor events:
- Apply clear lamination or protective film over the printed image to reduce moisture exposure.
- Use water-resistant adhesive to secure the print without weakening its bond.
- Seal exposed backing edges with suitable waterproof tape or edge-sealing material.
- Choose moisture-resistant foam board or plastic-based backing for outdoor displays.
- Cover the back surface to reduce moisture absorption through unprotected areas.
- Avoid prolonged rain exposure, even when the printed surface has protective lamination.
- Dry the cutout promptly after light moisture exposure and store it indoors.
How Do You Store and Transport a Big Head Cutout Without Damaging It?
To store and transport a big head cutout safely, protect its printed surface, edges, and attached handle from pressure and moisture. Store it flat with rigid support to prevent bending, or upright with a stable backing. Use a protective sleeve or bag to reduce scratches and keep heavy objects away from the cutout during transportation.
Below are the steps to store and transport a big head cutout safely:
Storage
- Place the cutout flat on a clean, dry surface with support beneath the entire shape.
- Store it upright only when a rigid surface supports the backing without bending.
- Cover the printed face with a protective sleeve or soft, clean sheet.
- Keep the cutout away from direct sunlight, excessive heat, and moisture.
- Avoid stacking heavy objects on top of the cutout or pressing against its edges.
Transportation
- Place the cutout between rigid cardboard sheets to protect its shape.
- Use a protective bag or sleeve to prevent scratches and surface damage.
- Position the cutout flat inside the vehicle when space allows.
- Secure the handle separately or cushion it to prevent pressure on its attachment point.
- Avoid placing luggage or heavy equipment against the printed surface.
- Protect delicate hair and shoulder edges from crushing during loading and unloading.
What Size Works Best for Big Head on a Stick?
A 16" x 20" or 12" x 18" print mounted on foam board is the best size for a big head on a stick because it provides strong visibility while remaining lightweight and easy to hold during events. Smaller 12" x 18" face cutouts work well for parties, dancing, and crowd giveaways, while 16" x 20" to 24" sizes are better for sports games, graduation ceremonies, and stadium crowds where long-distance visibility matters. For maximum visual impact, giant face cutouts between 36" and 48" are commonly used at large events and fan sections.
How Do You Make Graduation Big Head Cutouts?
You can make graduation big head cutouts by printing an oversized, high-resolution face photo, mounting the print on foam board or cardboard, adding graduation-themed customization, and attaching a handheld support stick for ceremony use. Graduation big head cutouts are commonly personalized with school colors, class-year text, mascot graphics, graduation caps, and senior celebration themes to improve visibility and create a more customized display prop for ceremonies, senior nights, and graduation parties.

To make graduation big head cutouts, follow the steps below:
- Step 1: Select a clear, high-resolution graduation photo
- Step 2: Crop and resize the image into a large-format portrait
- Step 3: Print the face cutout on poster paper or photo paper
- Step 4: Mount the print onto foam board or sturdy cardboard
- Step 5: Add school colors, graduation text, or class-year graphics
- Step 6: Attach a wooden paint stick or dowel to the back
- Step 7: Reinforce the handle area for better stability during events
What Size Works Best for Graduation Big Heads?
The best size for graduation big heads is 12" x 18" (Small) for easy carrying or 18" x 24" (Medium) for stronger visibility during ceremonies and senior celebrations. A 12" x 18" big head cutout remains lightweight and comfortable to hold during long events, while a 16" x 20" big head cutout is a popular DIY size because it balances portability with crowd visibility. For larger arenas, stadium graduations, and outdoor ceremonies, 18" x 24" provides better long-distance visibility without becoming difficult to manage.
How Do You Add School Colors and Graduation Text?
You can add school colors and graduation text to graduation big head cutouts by placing custom graphics, colored borders, mascot designs, and large text elements around the oversized portrait before printing on design platforms like Canva. School-themed customization helps the face sign match graduation ceremonies, senior nights, and class celebrations while improving visibility in large crowds and stadium settings. Popular graduation text for big head cutouts includes the student’s name, school initials, “Class of 2026,” graduation year graphics, and short celebratory phrases printed in bold, high-contrast lettering for easier readability from a distance.
How Do You Make Big Heads for Sports and Fan Face Signs?
To make big heads for sports and fan-face signs, start by printing a high-resolution, oversized face photo, mounting it on foam board or cardboard, and attaching a sturdy handheld support stick for use in stadiums and crowds. For better crowd visibility, most sports' big head cutouts include team colors, player numbers, mascot graphics, and slogans, with reinforced handles to improve durability and visibility during active crowd movement.

To make sports and fan face signs, follow the steps below:
- Step 1: Select a clear, high-resolution sports or fan photo
- Step 2: Crop and resize the image into a large-format face cutout
- Step 3: Print the oversized portrait on poster paper or photo paper
- Step 4: Mount the print onto foam board or durable cardboard backing
- Step 5: Add team colors, mascot graphics, player numbers, or fan slogans
- Step 6: Attach a wooden paint stick, dowel, or PVC handle to the back
- Step 7: Reinforce the handle and backing for stadium and outdoor use
What Size Works Best for Sports Big Head Cutouts?
The best size for sports big head cutouts is 18" x 24" or 24" x 36" because these sizes offer strong crowd visibility while staying manageable during games and stadium events. A 16" x 20" cutout is also a popular DIY option because it balances portability, visibility, and ease of handling for student sections, pep rallies, and indoor sporting events. Smaller 12" x 18" face signs work well for compact venues and group fan sections where lightweight handheld props are easier to carry. For larger outdoor games, playoff crowds, and tailgates, 24" x 36" sports big heads create a stronger visual impact and stay visible from farther away.
How Do You Protect Big Head Cutouts for Outdoor Games?
To protect big head cutouts for outdoor games, use waterproof, rigid backing materials such as corrugated plastic (Coroplast) or thick foam board, reinforce the handle area, and apply a laminated or water-resistant coating. Outdoor sports signs face wind, moisture, and constant movement, so reinforced handles, balanced support sticks, and durable backing materials help the oversized face cutout remain flat and stable during stadium events, tailgates, and playoff crowds. For additional durability, transport the cutout flat and avoid folding or stacking heavy items on top of the large-format sign.
What Are Popular Sports Big Head Ideas?
The most popular sports big head and fan-sign ideas include player face cutouts, fan section signs, cheer posters, and stadium face signs. Each format is tailored to specific types of crowd participation, from individual player recognition to massive, synchronized stadium displays.
Here are the popular sports big head ideas:
- Player face cutouts: Oversized athlete portraits used for player recognition and fan support during sports events. Common customization includes jersey graphics, player numbers, and mascot integration.
- Fan section signs: Lightweight handheld signs designed for coordinated cheering sections and synchronized crowd visuals. Perfect for student sections, pep rallies, and high-stakes playoff crowds that require high-energy movement.
- Cheer posters: Handheld signs that display motivational phrases, player-encouragement messages, and team-color graphics in oversized, readable lettering.
- Stadium face signs: Giant oversized portraits designed for broadcast visibility, arena displays, and tailgate events. Includes extra-large foam board backing, reinforced handles, durable support materials, and weather-resistant coatings.
Where Can You Use Big Head Cutouts?
You can use DIY big head cutouts at birthday parties, graduation ceremonies, sporting events, bachelor parties, concerts, school events, and corporate gatherings. Each setting benefits from these props by creating an immediate focal point, adding humor and visibility, enhancing photo opportunities, and helping guests show enthusiasm in a highly visible, personalized way.
7 common events where big head cutouts can be used are:
- Birthday parties: Use big head cutouts as photo booth props, surprise decorations, and personalized party displays to increase guest engagement and make the celebration more interactive.
- Graduation ceremonies: Families use oversized face signs during commencement ceremonies to improve visibility in large stadiums and help graduates spot supporters in crowded seating areas.
- Sports events: Fans hold up sports big-head cutouts during games, pep rallies, and playoff crowds to support players, boost stadium participation, and increase broadcast visibility.
- Bachelor parties: Oversized face cutouts work as humorous handheld props that keep the groom or bride central to the celebration while improving group interaction in crowded venues.
- Concerts: Concertgoers use big head cutouts and performer cutouts to attract artists' attention and create high-visibility landmarks for friends in large festival crowds.
- School events: Schools use handheld face signs during pep rallies, assemblies, and spirit weeks to build school spirit, celebrate students, and improve crowd participation with mascot-themed graphics.
- Corporate events: Businesses use high-resolution big head cutouts at trade shows, retirement parties, conferences, and office celebrations to create memorable photo opportunities and boost audience engagement.
What Common Mistakes Should You Avoid When Making Big Head Cutouts?
Common mistakes to avoid when making DIY big head cutouts include using low-resolution photos, misaligning printed sheets, choosing weak backing materials, creating rough edges, and using low-quality print settings. These mistakes reduce print clarity, structural durability, alignment accuracy, and overall usability during events and when used in handheld displays.
5 common mistakes to avoid when making big head cutouts are:
- Using Low-Resolution Photos
Low-resolution images (below 300 DPI) appear blurry, pixelated, or stretched when enlarged, reducing the visual quality of the big heads. Use a clear, high-resolution front-facing photo with bright lighting to maintain sharp facial details after scaling.
- Poor Alignment Between Printed Sheets
Misaligned tiled sheets create visible gaps, uneven facial features, and distorted outlines across the finished big head cutout. To fix this, use a straightedge to trim the white borders precisely and align the facial features carefully before taping the sheets from the back.
- Weak Backing Materials
Using flimsy poster board causes signs to wilt or fold in the wind and humidity, making the big head cutouts unusable during events. For this issue, always use 3/16-inch foam board or double-walled cardboard and extend the handle halfway up the back to create a spine.
- Poor Cutting Around Hair and Edges
Dull blades or imprecise paths create jagged, choppy silhouettes that look like unfinished crafts, which also leads the paper in a big head cutout to peel away. To avoid this, use a fresh X-Acto blade for intricate details and leave a slim white border to provide a clean, professional sticker finish.
- Low-Quality Print Settings
Low print quality results in faded colors, blurry graphics, and low contrast, reducing the long-distance visibility of large head cutouts. Select high-quality print settings and full-color output to keep the oversized portrait sharp, vibrant, and readable during events.
How Much Does It Cost to Make a Big Head Cutout?
The cost to make a big head cutout ranges from $3 to $10 for a DIY homemade version and $15 to $35 or more for a professionally printed cutout ordered online. The final price depends on the cutout dimensions, printing method, and materials selected. Home printing costs less when basic supplies are already available, while professional services charge for printing and production.
DIY expenses include paper, ink, cardboard or foam board, adhesive, and handle materials. Standard printer paper and reused cardboard help minimize costs, while photo paper, thicker backing, and larger dimensions increase expenses. Custom-printed options may also involve shipping charges.
What Affects the Cost of a DIY Big Head Cutout?
Factors affecting the cost of a DIY big head cutout include cutout size, printing method, paper type, backing material, adhesive, and handle material. Each factor affects the quantity, quality, or price of the required materials. Lower-cost options suit simple indoor projects, while higher-cost alternatives may be worthwhile for larger cutouts, frequent handling, or outdoor events.
- Cutout size
Larger dimensions increase the printed area, number of tiled sheets, and amount of backing material required. An 18 × 24-inch cutout uses fewer resources than a 24 × 36-inch version. Smaller dimensions reduce paper waste and board offcuts, while oversized printing may justify the extra cost when greater crowd visibility is needed.
- Printing method
Home printing uses paper, ink or toner, and may require several tiled pages. Copy shops charge for printing services, while large-format printers produce continuous posters without assembling multiple sheets. Home printing can cost less when supplies are on hand, but professional printing may justify its higher price with consistent color output and fewer reprints.
- Paper type
Standard printer paper provides a lower-cost option than heavyweight matte or glossy photo stock. Thicker paper and specialized finishes can increase the per-sheet cost, especially when you need several pages. Choose ordinary paper for economical indoor cutouts, and use compatible photo paper when sharper details or a specific surface finish justify the extra cost.
- Backing material
Cardboard can reduce the overall cost of a DIY big head cutout, while corrugated board and foam board may cost more depending on thickness and rigidity. Larger cutouts require bigger backing sheets or additional material. Choose affordable cardboard for smaller displays and thicker foam board when greater structural support justifies the extra expense.
- Adhesive
Glue sticks and double-sided tape can be economical for smaller prints, while spray adhesive or specialized mounting adhesive may cost more. Total cost depends on quantity, coverage area, and application method. Larger cutouts require more adhesive coverage, so a reliable mounting product is worth it when preventing wrinkles, peeling, and weak bonds matters.
- Handle material
Reused cardboard strips and paint stirrers can minimize handle expenses, while wooden dowels or other rigid supports may require an additional purchase. Longer handles and heavier cutouts can also require reinforcement materials. Choose an inexpensive stick for lightweight displays, and use a sturdier support when the cutout's size or repeated handling justifies the extra cost.
Should You Make DIY Big Head Cutouts or Order Custom Ones?
Make DIY big head cutouts when you need a low-cost, fast option for small events or personal projects, while custom big head cutouts work better for professional-quality prints, large-format signs, and durable event displays. DIY big heads give you full control over photo selection, print size, and backing materials, making them a practical choice for birthday parties and graduation ceremonies. In contrast, custom big head cutouts and professionally printed big heads provide cleaner cuts, sharper print quality, stronger durability, and better large-format printing.
When to DIY vs. When to Order?
Choosing between DIY and custom big head cutouts depends on your budget, printing requirements, available time, and intended use. DIY cutouts offer greater control over materials and design at a lower cost, making them suitable for smaller celebrations. Professionally printed cutouts provide more consistent print quality, precise cutting, and stronger durability for larger events.
The table below compares DIY and custom big head cutouts based on six key factors:
|
Feature |
DIY Big Head Cutouts |
Custom Big Head Cutouts |
|
Cost |
$5 to $30 |
$14 to $150 |
|
Print Quality |
Depends on the home printer |
High-resolution professional printing |
|
Durability |
Moderate |
High |
|
Precision |
Manual |
Machine-Cut |
|
Time Required |
Requires assembly and cutting |
Ready-to-use after delivery |
|
Best For |
Small events and DIY projects |
Stadium events, promotions, and large displays |